blogs
projects
Short K8S guide
04/23/2026
◈◈◈◈◈◈◈◈◈◈◈◈◈◈◈◈◈◈◈◈◈◈◈
Hi. Been a while.
I haven't done anything on this website in a very long time. Been very busy lately...
This page will serve as a small guide to using Kubernetes and how you can set it up locally (for a project I did).
Let's start off with the obvious.
What is Kubernetes (K8S)?
Kubernetes (K8S) is an open-source platform that manages containerized applications for engineers. Instead of manually managing servers and containers, K8S handles it automatically by restarting crashed containers, scaling up when traffic increases, and managing networking between containers across multiple machines.
Here is a real world example:
Imagine you run an online store. Everyday, ~1,000 users visit the website. Your application runs fine on a single server, but on Black Friday, there is a massive traffic surge and the user count jumps to 100,000+. Without K8S, the website admin (you) would have to manually spin up more servers, configure them, and set up load balancing all while hoping everything goes smoothly.
With K8S, you wouldn't have to worry as you can set it to automatically scale up when detecting traffic spikes. You also have the option to scale up manually if that is what you prefer. After this Black Friday surge, it scales back down so you're not paying for unused servers.
Without K8S
With K8S
How it works
Pods
Deployments
Services
Getting Started
Step 1: Install Docker Desktop
First, you need to get Docker Desktop. It's a tool which comes with Kubernetes built-in.
Go to Docker Desktop's page and download it for your corresponding operating system where it says:
Download Docker Desktop.
Step 2: Enable Kubernetes
As stated earlier, Docker Desktop has Kubernetes built-in, but you need to turn it on.
- Open Docker Desktop
- Go to Settings at the top (should look like this icon: )
- In the settings menu, click Kubernetes on the sidebar
- Check the Enable Kubernetes slider
- Click Apply. If prompted with the cluster installation, click Install.
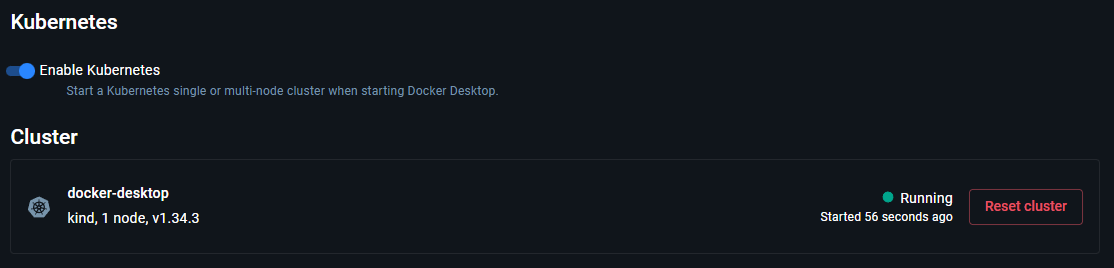
Wait a few minutes for Kubernetes to boot up. The cluster status will be Running once it's ready (similar to the image below).
Docker will also display the status of Kubernetes at the bottom of your screen like this:

Step 3: Verify Installation
To verify proper Kubernetes installation, you can run the following command in your terminal:
kubectl versionIf you see the version info, then Kubernetes has been installed properly.
Step 4: Creation of the example web application
For this example, we'll be using a Dockerfile alongside a JS script to display a simple greeting message alongside what Pod is being utilized on the webpage using Kubernetes.
Create a folder to store your files, and make a file called app.js:
const express = require('express');
const fs = require('fs');
const os = require('os');
const PORT = 8080;

const podName = os.hostname();
const app = express();

app.use(express.urlencoded({ extended: true }));

app.post('/create-file', (req, res) => {
    const content = req.body.content;
    const filename = req.body.filename;

    fs.writeFileSync('./uploads/' + Date.now() + '-' + filename + '.txt', content);
    res.send(`File created on Pod: ${podName}. <a href="/">Back</a>`);
});

app.get('/', (req, res) => {
    res.send(`
        <form method="post" action="/create-file">
            <h2>Content for file</h2>
            <textarea name="content" required></textarea>
            <h2>Filename</h2>
            <input type="text" name="filename" required>
            <button type="submit">Create file for submission</button>
        </form>
        `)
});

app.listen(PORT);
Next, package this in Docker using a file called Dockerfile:
FROM node:18-alpine
WORKDIR /app

COPY package.json ./
COPY package-lock.json ./

RUN npm install

COPY app.js .
RUN mkdir /app/uploads
CMD ["node", "app.js"]
From here, open the terminal in the folder where you stored your files and run the following command to build your app:
docker build -t hello-world-app:latest .Step 5: Create a Deployment
Remember the Deployments from earlier? I'll guide you through a YAML file which configures the Deployment for whatever application you want Kubernetes to run.
Create a file called deployment.yaml and add the following code. I will explain what it does after:
apiVersion: apps/v1                                 # tells K8S which API to use
kind: Deployment                                    # what type of resource do we want?
metadata:                                           # deployment info
    name: hello-world                               # name of deployment
spec:                                               # what do we want from K8S?
    replicas: 3                                     # how many copies of this app?
    selector:                                       # which pods does deployment manage?
        matchLabels:
            app: hello-world                        # all pods labeled 'hello-world'
    template:                                       # template for each new pod
        metadata:
            labels:
                app: hello-world                    # label each pod 'hello-world'
        spec:                                       # what goes in each pod?
          volumes:                                  # storage attached to pods
          - name: uploads                           # name of the volume
            persistentVolumeClaim:                  # use persistent storage
              claimName: uploads-pvc                # reference the PVC we created

          containers:                               # list of containers
          - name: hello-world                       # container name
            image: hello-world-app:latest           # web server to run
            ports:                                  # port that the app listens on
            - containerPort: 8080
So, what does this code actually do?
- apiVersion & kind -
apiVersion: apps/v1tells Kubernetes we're using the Deployment API.kind: Deploymentsets this file as a Deployment resource. - metadata - Metadata contains data that uniquely identifies an object within Kubernetes. In this instance, we name our Deployment using
name: hello-world. - spec - The specification section is where you define how you want your Deployments or Pods to look like.
- replicas - How many copies of your app you want running. In this case, we want 3 Pods.
- selector & matchLabels - Tells Kubernetes which Pods to manage. Kubernetes looks for Pods with the label
app: hello-worldand manages them. - template - The outline for creating new Pods. It just defines what each Pod should have.
- volumes - For this demo that we'll make, we're going to be utilizing a storage type called
persistentVolumeClaim. We will be able to visualize how Kubernetes stores files throughout Pods. - containers - What will run within each Pod. We're using
hello-world-app:latest, which is the app we built earlier. It will listen via port 8080 fromcontainerPort.
Step 6: Create a Service
Now create a file called service.yaml for routing your app:
apiVersion: v1                                 # API version for services
kind: Service                                  # what type of resource?
metadata:                                      # service info
    name: hello-world-service                  # name of service
spec:                                          # what do we want from K8S?
    type: LoadBalancer                         # type of service
    selector:                                  # which pods does service route to?
        app: hello-world                       # all pods named 'hello-world'
    ports:                                     # what port users connect to
    -   name: http
        port: 8080
        targetPort: 8080
What is different here compared to deployment.yaml?
- type - In this file, we're using the
LoadBalancertype, which balances the load across Pods and assigns a public IP so users can access your application.
Step 7: Create a PVC
Finally, we're going to add a way to store files. Create a file called pvc.yaml:
apiVersion: v1                                 # API version for PVC
kind: PersistentVolumeClaim                    # what type of resource?
metadata:                                      # PVC info
    name: uploads-pvc                          # name of PVC
spec:                                          # what do we want from K8S?
    accessModes:                               # how many pods can access this storage?
    - ReadWriteOnce                            # one at a time

    resources:
        requests:
            storage: 10M
Step 8: Deploy to Kubernetes
Now that we have our files, let's deploy it to the local Kubernetes cluster.
Make sure your files are in a folder together. Open the terminal in the folder where your files are, then run the following:
kubectl apply -f deployment.yaml
kubectl apply -f service.yaml
kubectl apply -f pvc.yaml
If everything has been successful up to this point, Kubernetes will create 3 Pods running nginx and make them public through the LoadBalancer Service.
Step 9: Verify Deployment
To check that everything is running correctly, run the following:
kubectl get podsYou should see 3 Pods with NAMEs like hello-world-xxxxxxxxx-xxxxx all with a STATUS of 'Running'.
To view the service, run the following:
kubectl get servicesYou should see the hello-world-service that we created. We'll port forward this service to see what is happening locally. Run the following command:
kubectl port-forward service/hello-world-service 8080:8080In your terminal, Kubernetes should have given you a location where it's forwarding from, something likeForwarding from [::1]:8080 -> 8080
From here, we can actually view the JS file within the browser depending on what Kubernetes is forwarding with. In my case, I will type http://[::1]:8080/ within my browser. If that doesn't work for you, try http://localhost:8080/
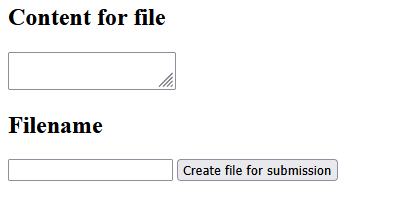
If everything has been successful up to this point, then great news! You should see a similar output to the image below:
Step 10: Run locally
Since we aren't able to connect to localhost from other devices, we'll have to port forward using the PC's IP. Find your computer's local IPv4 address (usually starts with 192.168). Depending on your operating system, you can find it through your terminal. Once you have your IPv4 address, type the following into terminal:
kubectl port-forward service/hello-world-service 8080:8080 --address=(YOUR PC IP)Now, on another device, type your computer IP followed by :8080 into your search bar. You should be able to connect to the same page.
Step 11: File storage
Now, to watch the load balancer in action, we'll use multiple devices. Connect to the page from the previous step on 2 or more devices. You can write anything in the content box, but for the filename, make sure you don't include .txt, as that gets appended to whatever string you type in the box. Once you create the file, you should see something similar to this:

Create multiple files. For the purpose of this demo, we are only able to use one Pod as the load balancer hasn't been treating me well and I wasn't able to resolve this issue. It works fine through the cloud. After you have made your files, open another terminal up while having your port forward going. Use this command:
kubectl exec -it (YOUR POD NAME) -- ls /app/uploadsYou should see whatever files you created in this Pod. Now, if you were to delete this Pod, all files would be lost. Run this:
kubectl delete pod (YOUR POD NAME)Running the previous exec command shows that the Pod is not found. Once the Pod is fully removed from the system, your file requests will go to a different Pod. This is an aspect of Kubernetes called Self-Healing, which means that whenever a Pod goes down, one gets spun up immediately.
Step 11: Scaling the Deployment
Another great aspect of Kubernetes is the ability to scale your application instantly or automatically. We'll scale our application manually just for example. To scale the deployment up to 5 pods, run:
kubectl scale deployment hello-world --replicas=5From then on, you can view your Pods as usual using the command from steps 8 and 9 and see that there are 2 more Pods added to our deployment. You can also scale down if you'd like. Go ahead and try for yourself!
In essence...
That's it! You now have a working Kubernetes setup on your local machine. It can also be run through the cloud for your needs. Kubernetes can do much more, but understanding the fundamentals is the foundation for the rest.
Hope this was helpful c: